
Are you wondering how to set up GA4? You are on the right track by visiting Mosaic eMarketing. In the digital age, understanding your website’s performance is paramount to success. Google Analytics 4 (GA4) is the latest iteration of Google’s powerful analytics platform, offering advanced features and insights to help you make data-driven decisions. In this comprehensive guide, we’ll walk you through the process of setting up GA4 step by step, ensuring that you harness the full potential of this indispensable tool.
If you don’t already have a Google Analytics 4 account, start by visiting the Google Analytics website (https://analytics.google.com/) and sign in with your Google account. If you don’t have a Google account, you can create one for free.
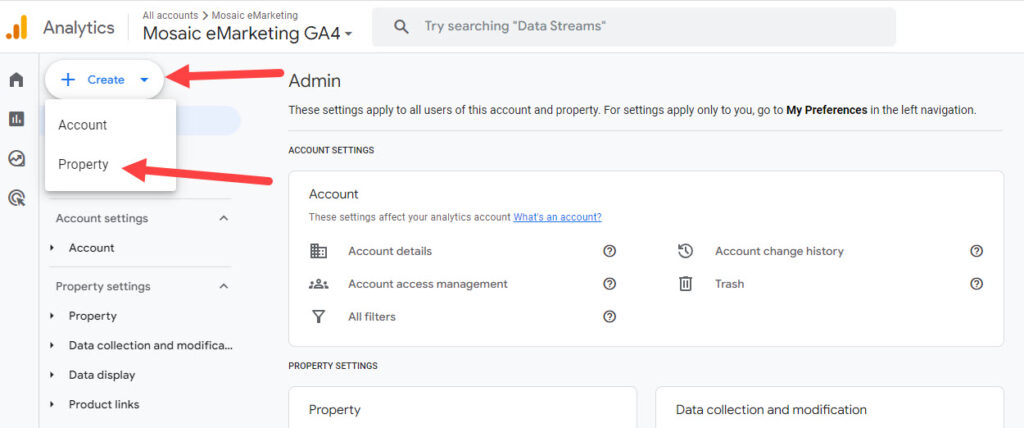
Once you’re logged in, click on the “Admin” button in the lower-left corner of the screen. In the Admin section, click on the “Create” button and “Create Property.”
If you are still wondering how to set up a Google Analytics 4 property, contact our team for help.
After configuring your property settings, you’ll need to set up a data stream for your website. Click on “Web” under the Data Stream column and follow the on-screen instructions. You’ll need to add the GA4 tracking code to your website.
To track user interactions on your website, you need to install the GA4 tracking code. Google Analytics 4 provides a unique code snippet that you should add to every page of your website just before the closing </head> tag. If you’re using a content management system (CMS) like WordPress, you can use plugins to simplify this process. We like to use this plugin on WordPress. You can also install Google Tag Manager (GTM) on your website and install the GA4 code through GTM.
To do that, once Google Tag Manager is installed and you are logged in, click on “New” in the upper right corner. From there, click on “Tag Configuration” and then “Google Tag”. Once you click on Google Tag”, it will ask you for a “Tag ID”. This is called your Measurement ID in Google Analytics 4. To find your measurement ID in GA4, log in to GA4, click on “Admin,”, click on “Data Streams”, click on your data stream, and then your Measurement ID will be shown in the upper right corner of the screen.
Once you have your measurement ID, place it in Google Tag Manager, where they are asking for “Tag ID”. Next, click in the “Triggering” section and select “All Pages”. Once this is completed, click on Submit and follow the prompts to make sure GTM publishes the code on your site.
Watch this video to see each step in the installation process through Google Tag Manager.
If you are still wondering how to set up GA4 on your website, contact our team for help.
After adding the tracking code, it’s crucial to verify its installation. You can use the Google Tag Assistant Chrome extension to check if GA4 is tracking your website correctly. After giving GA4 some time to process data, you can also check the “Real Time” reports to see if it is registering your activity.
To gain valuable insights into user interactions, configure events, and conversions tracking in GA4. Events can include actions like page views, button clicks, and form submissions. To set up events, follow these steps:
You can also set up events in Google Tag Manager, which will automatically create them in GA4. The video below shows you how to set up an event in Google Tag Manager using a destination URL as the trigger, for example, a “thank you” page. You can also create events on button clicks, form fills, and many other actions.
Conversions are essential for tracking specific user goals, such as sign-ups or purchases. To set up conversions:
If you are still wondering how to set up GA4 events or how to set up GA4 conversions, reach out to our team, and we would be happy to help.
User properties allow you to segment and analyze your audience based on specific characteristics or behaviors. You can define user properties related to demographics, interests, and more. To set up user properties:
Enhanced Measurement provides additional data tracking capabilities, such as scroll tracking and outbound clicks. To enable Enhanced Measurement:
Before fully relying on your GA4 configuration, it’s essential to thoroughly test it by navigating through your website and checking that events and conversions are tracking correctly. Additionally, regularly monitor your GA4 reports to gain insights into user behavior and make data-driven decisions to optimize your website.
Still wondering how to set up GA4 and test your Google Analytics 4 setup? Contact Mosiac for help.
Congratulations! You’ve successfully set up Google Analytics 4 (GA4) for your website, and you’re now equipped with a powerful tool to track user interactions, analyze data, and enhance your digital presence. Remember that ongoing monitoring and analysis are key to unlocking the full potential of GA4 and making informed decisions to improve your online strategy.
Are you still wondering how to set up GA4 and need assistance? We would love to help!
 (888) 924-9349